
Product badges module
Small labels that say why a product deserves a second look.
In short
Badges mark products that stand out - on sale, new in, nearly gone, selling well. Seven types are available, each with its own condition deciding which products get it, and each with wording you can leave to WooCommerce or write yourself. One module shows one badge, so place it again for a second.

Note
Badges read WooCommerce product data - sale prices, stock, sales counts - so they only apply when you're filtering products.
How badges work
A badge isn't something you put on a product. It's a rule the module applies to every result: pick a type, and the badge appears on the products that meet its condition and stays away from the rest. Nothing has to be tagged by hand, and nothing goes stale - a product that stops being on sale stops carrying the sale badge.
Each module shows one type. To mark both new arrivals and sale items, place the module twice and set each copy to a different type.
The seven types
Each type carries its own condition, and the settings underneath change with the one you pick.
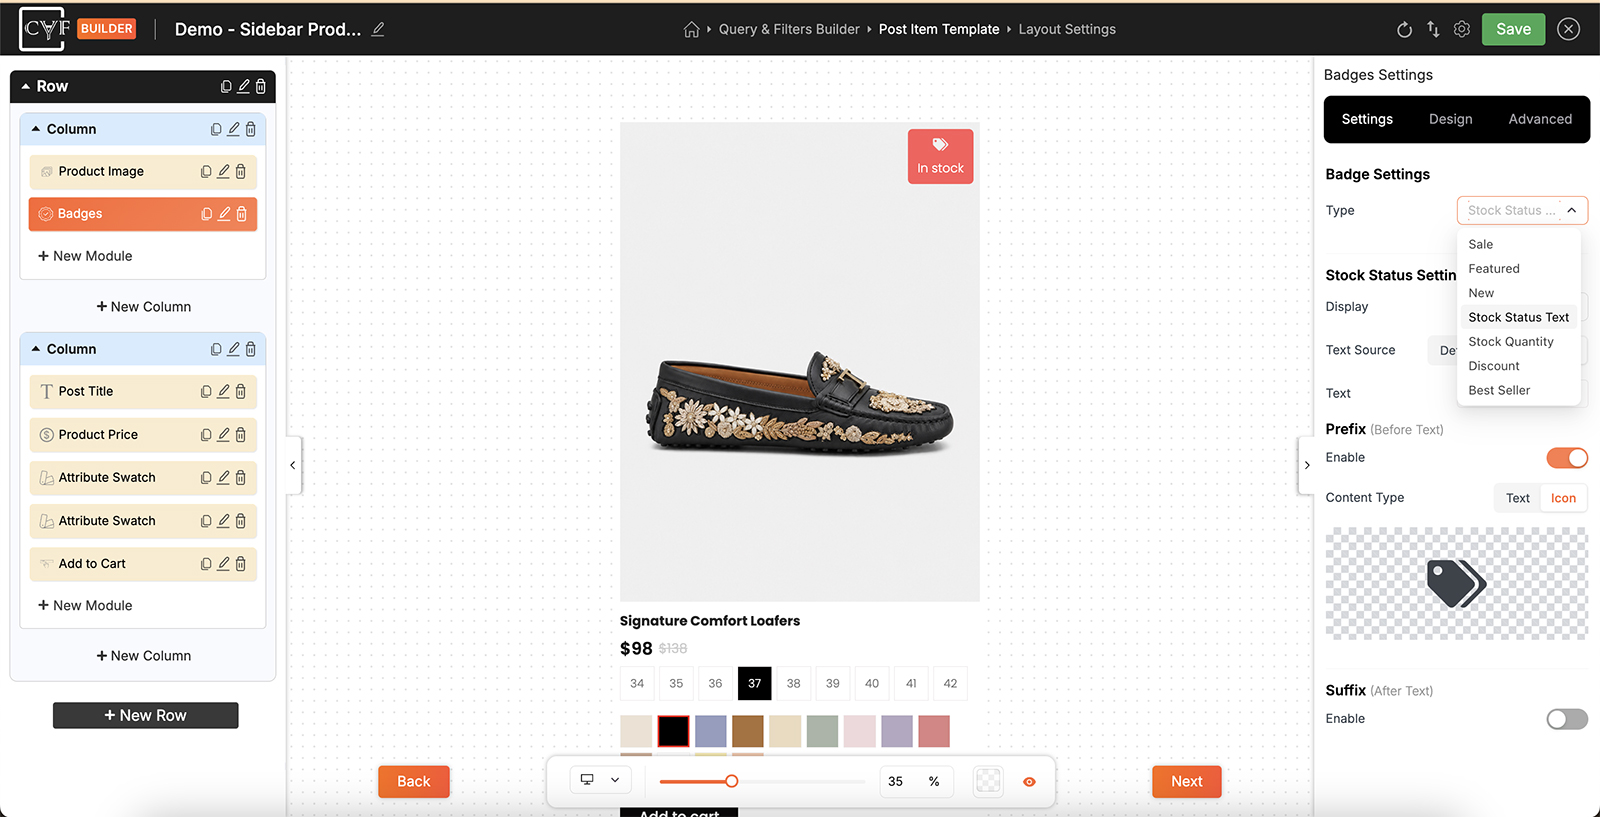
Seven types, each with its own condition.
Sale
Appears on any product with a sale price set. There's no condition to configure - WooCommerce already knows what's discounted - so all you set is the wording.
Featured
Appears on products you've marked featured in WooCommerce. Again there's nothing to configure but the wording, because the decision has already been made in the product itself. It's the one badge under your direct control rather than driven by data.
New
Appears on recently published products. Condition is either the default or a number of days you set.
Days is the one to use, because it lets you decide what new means on your shop, and that depends entirely on how often you add stock. A shop adding products weekly wants a short window; one adding a few a year can afford months.
Stock Status Text
Reports a product's stock state. Display decides which products get the badge and what it says.
| Display | What happens |
|---|---|
| Current Stock Status | Every product shows its own status, whatever that is. |
| In Stock Only | Only products in stock are badged. |
| Out Of Stock Only | Only products that have run out. |
| Backorder Only | Only products available on backorder. |
Out Of Stock Only is the useful one on most shops. Marking what's available says little when nearly everything is; marking what isn't saves a shopper the click.
Stock Quantity
Shows the number of items left. Low Stock Threshold is what keeps it from appearing on everything: switch it on, set Show When Quantity, and the badge only appears once stock has fallen to that level or below.
Without the threshold every product carries a number, which tells a shopper nothing and reads like stock-keeping data leaking onto the shop. With it, the badge only shows when the number is worth acting on.
Discount
Appears on discounted products and says how much is off. Type decides whether that's a Percentage or an Amount.
Percentage reads better on cheap items and an amount on expensive ones - the same reduction can look generous one way and negligible the other, so it's worth choosing against your own prices rather than by habit.
Best Seller
Appears on products that have sold enough to qualify. Min Sale Count is the number of sales needed.
Left at the default it will badge a great many products. Setting it deliberately, against what a genuinely strong seller looks like on your shop, is what keeps the badge meaning something.

Tip
Use one or two badge types, not seven. A badge works by standing out from the products around it, so a listing where every card carries two or three has no badges at all - just decoration.
The wording
Text Source is either Default, which uses WooCommerce's own wording, or Custom Text, where you write your own. Custom is worth taking: badge wording is a place where a shop's voice shows, and the default is deliberately plain.
Keep it short whichever you choose. A badge is read at a glance from the corner of an eye, and anything longer than a couple of words stops being a badge and becomes a label.
Prefix and Suffix
| Setting | What it does |
|---|---|
| Prefix | Something before the badge text. Switch it on, choose Text or Icon, and set it. |
| Suffix | Something after it. Same again, chosen separately. |
On the badges that show a number these do real work - a percentage discount needs something after it to read as a discount rather than a figure, and an icon in front of a stock count says what's being counted.
Styling
How the badge looks comes from the Design tab, with the usual groups - Layout, Text, Sizing, Spacing, Background, Border and Box Shadow- so a badge can be a filled pill, a plain outline, or just coloured text.
To sit a badge over the corner of a product image rather than in the flow of the card, use the Positioning options on the Advanced tab.
Give different badge types different colours. If your sale badge and your new badge look alike, a shopper has to read both to tell them apart, which defeats the purpose.
FAQ
Can one module show two badges?
No - it shows one type. Place the module again for another.
How do I decide what counts as new?
Set the condition to Days and enter a number that suits how often you add products.
Every product is showing a stock number.
Switch on Low Stock Threshold and set the quantity, so the badge only appears when stock is low.
How do I mark only what's out of stock?
Choose Stock Status Text, then set Display to Out Of Stock Only.
Can the discount show an amount rather than a percentage?
Yes - set the discount type to Amount.
My best seller badge is on nearly everything.
Raise the Min Sale Count.
Can I write my own badge wording?
Yes - set Text Source to Custom Text.
How do I put the badge over the product image?
Use the Positioning options on the Advanced tab.
Was this page helpful?
Thanks for your feedback!